Magnet Experiments: Build a Speaker with Magnets
Can you imagine life without music? Well, without magnets it would be pretty difficult to listen to it. Did you know that magnets are inside speakers and headphones? Magnets allow us to hear the music that we love so much. You can even create your own DIY set of speakers with some magnets and learn a little bit about audio, electricity and science in the process. There are tons of variations on homemade speakers, even a Mason jar version. But, we have created a simple version for those of you that would like to try it out!
Supplies
- Paper cup (You can also use a styrofoam plate.)
- Round magnet
- Tape
- Copper wire
- Cardboard
- Old audio plugs (headphones)
Steps
- Coil the copper wire into a circular frame, about the size of your disc magnet. Then wrap pieces of wire on opposite sides of the coil. Leave a couple inches of wire hanging off each end.
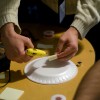
- Flip the paper or styrofoam cup upside down and tape the coil of wire to the bottom.
- Next tape a round magnet to a piece of cardboard and then place the magnet inside but not touching the circular coil of wire.
- Tape the cardboard backing into place with some tape. Be sure to leave space to allow access to the coil.
- Take your audio plugs and strip the outer coating so that the wire is exposed. Leave the plug side intact so that you can plug it into your audio device later.
- Connect the audio plug wires to the coil of wire.
- Plug the jack into a computer, radio or other audio device and test how it plays!