How To Make A Magnetic Bookmark
Many bookworms will understand the frustration of losing your place when reading a good book. Whether you’re interrupted in the middle of an exciting chapter or you need to take notes on something you’ve just read, remembering your page number is one extra and unnecessary step. With this DIY project for a magnetic bookmark, you won’t leave all your pages dog-eared. Even if you’re not a big reader, with this magnetic bookmark you won’t lose your place in your magazine, textbook, and even your journal.
Supplies:
- Spare fabric
- 2 Small magnets for crafts
- Sewing materials (needle and thread)
- First, measure your magnets. You want to use thin magnets such as these 1/2” x 1/2” x 1/16” neodymium block magnets so they don’t damage the binding of your book while they hold your place.
- After measuring the magnets, you can determine how much fabric you need. You should have enough to fabric to completely cover the magnets with about 1/4" for seams along the edges. So, for 1/2" x 1/2" block magnets, you’ll need a rectangle of fabric measuring 1” in width by 4 1/2" in length.
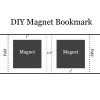
- Next, lay your fabric out with the visible side down. Place the two magnets in the middle with about an 1” of space separating them like in the diagram above.
- Fold along the black dotted lines so the green edge meets the green dotted line and the red edge meets the red dotted line.
- Next, you’ll sew seams around the magnets so they are completely covered and secured in place within the fabric.
- When you’re done sewing there should be 1/2" in between the magnets. This is the part you’ll fold over the edge of the pages of your book. The magnets will attract through the pages and hold the bookmark in place.