DIY: Clothes Magnets Activity for Father’s Day
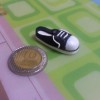
If your family is one that loves to adorn its fridge with colorful magnets and family photos, then these DIY magnets might be perfect for you. In this tutorial, we’re making our own DIY clothes magnets and then attaching them to family photos to create funny, movable magnet pieces. Some examples of cute magnets that you can include in your Father’s Day gift set are: sports jerseys, ties, bowties, shoes, vests and almost any other article of clothing.
Here is a simple tutorial that you can use to create your own fridge dress up set.
Supplies
- Polymer clay
- Rolling pin
- Craft paint (optional)
- Self adhesive magnets
- Baking sheet
- Neodymium magnets
- Craft glue
Steps
- Knead your clay until soft and roll it flat with about ¼ inch thickness.
- Form your polymer clay into various clothing shapes. They should be little enough to fit onto any pictures you have on your fridge, about ½ inch in width is suitable. You can do this by purchasing clothes shaped cookie cutters or hand sculpting them.
- Now that you have the basic shapes, you can add details! You can either layer on different colors of polymer clay for details or you can paint the details onto white clay. If using paint, then wait until after baking and cooling to paint.
- Once your clothing pieces are made place them on a non-stick oven sheet.
- Bake at 275° for 10-15 minutes. Baking times may vary depending on what type of polymer clay is used. Most have baking instructions to help gauge time and temperature.
- Let cool 30 minutes to one hour.
- Attach self-adhesive magnets or use strong craft glue to place the neodymium magnets to the back of the clothing shapes.
- Then find your favorite Dad photo and test out your new clothes magnet sets for some fun entertainment!