DIY Tie-Dye Marbled Clay Magnets
While warm days and sunshine are on there way, there are bound to also be some rainy days this summer. If you need a simple indoor project, these DIY, tie-dye marbled clay magnets are a fun and easy craft to brighten up your day. You can personalize each magnet with your own color schemes, patterns and shapes. You can get almost of the supplies for this craft at your local craft supplies store, which makes these just as convenient to make as they are fun! These clay magnets will be entertaining to create for the entire family!
What You’ll Need:
- Oven bake clay (multiple colors, plus white)
- Clay Roller
- Circle cookie cutter
- Parchment Paper
- Hot glue gun
- 12mm x 2mm disc magnets
- Break ½ inch pieces of 2 to 3 colors of clay, along with a piece of the white clay.
- Roll all the pieces of clay together, into a “snake” shape. To combine all the pieces, twist them together. This step will create the tie-dye marbled look.
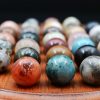
- Once you have clay twisted into your desired color pattern, roll into ball and use the clay roller to flatten to about ½ inch thick.
- Use a circle cookie cutter (or any circular object) to cut a circle into clay. You could also use other cookie cutters, or objects to cut the clay into other shapes.
- Repeat this step for however many magnets you want to make.
- Lay a sheet of parchment paper on a cookie tray. Place your clay circles (or other shapes) onto the parchment paper and bake in the oven at 275 degrees for 25 minutes. Let clay completely cool.
- Use the hot glue gun to add a pea-sized amount of glue on one side of each piece of baked clay. Wait 15 seconds before adding the magnet onto the glue. Let the glue dry completely for the magnet to set.
- Stick your tie-dye, marbled creation on the fridge and enjoy!