DIY: Traveling Map Magnets
Are you traveling somewhere exciting for vacation this summer? Map your journey with magnets! Whether you are going a few states over, to a nearby beach or traveling across the globe these DIY magnet projects are a neat way to remember your experience. We have two ways that you can combine magnets and maps to record your travels.
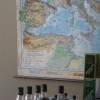
DIY Magnetic Map Board
This DIY can be used for both national and global travel! Take a large map for the area of your choice. You can even use a world map and not only map the places you’ve been, but also the places you want to go in the future.Supplies
- Pin magnets
- Paper map
- Frame
- Foam board/Cardboard for frame backing
- Magnetic paint
- Spray paint (optional)
Steps
- Layer the cardboard back with the magnetic paint. Use several coats of paint for stronger hold but be careful not to use too much to avoid saturating the cardboard. Foam board is generally less likely to saturate but cardboard will also work for this project.
- Allow the magnetic paint to dry. This may take several hours or overnight.
- Once dry, fit your map inside the frame and place the cardboard or foam backing into the frame with the painted side touching the map. If you are using an older frame you can spray paint it in a well-ventilated area.
- Adjust your frame and secure the back and map inside.
- Lastly, hang your framed magnetic map and mark your travels with some colorful magnet pins.
DIY Cutout Magnetic Map
This version is ideal for cross country road trips. With a map of the US and some magnets, you can chart your travels!Supplies
- Paper map
- Pin magnets
- Foam board or cardboard
- Glue
- Magnetic paint
- X-acto knife
Steps
- Paint your foam board or cardboard with several layers of magnetic paint.
- Let dry for two or more hours or overnight.
- Once dry, take your paper map and glue it to the foam board with the back of the map touching the painted surface. This will make the map magnetic.
- Using an X-acto knife or a die cutting machine carefully cut out the foam board to the shape of the map.
- Hang up your map and easily mark your favorite vacation spots with pin magnets.