Jitterbug Magnet Craft
This next craft will have the entire family amazed by the power of a few simple disc magnets! Pick up your supplies, set a time, and get ready to experience the wonders of magnetic attraction with your own homemade jitterbugs! This DIY will keep everyone entertained, so why wait for a rainy day? Try taking your supplies outside and get crafting while soaking in some sunshine!
*Parental guidance is required for this craft.
Prepare Your Supplies
Here is what you will need:
- Cereal box
- Scotch tape
- Glue gun
- Glue stick
- Hobby knife or box cutter
- Pencil
- Ruler
- Scissors
- Ping pong ball
- Fishing line 10 inches / 250mm
- Disc magnets (we recommend 18mm x 3mm)
- 6 Wooden skewers
- Long sewing needle
- Side cutters
- White marker or pieces of chalk
- Markers or paint to decorate
- Reusable adhesive
- Black cardstock
- Jitterbug templates (sign up with your email to download templates)
Instructions:
Make the pyramid:
- Begin by printing out your template pieces.
- Gather your wooden skewers, ruler, pencil, and small side cutters.
- Measure 8 1/2" on three of your wooden skewers and trim them to that length (note it is easiest to cut each of your skewers at an angle so you may easily join them together. (side cutters work best for cutting accurate angles).
- Measure 9 1/2“ on your remaining three wooden skewers and trim them to that length (cut at an angle as in step 3).
Create the base of the pyramid:
- Take your hot glue gun and place a small amount on the end of one 9 1/2" skewer, affixing it securely to another skewer.
- Repeat the process in step five to attach your third skewer to your other two pieces, forming a triangle.
Making the top of the prism:
- Using two of your three remaining 8 1/2" skewers, glue them together as before, joining your third and final skewer to the other two accordingly.
- The top section of your pyramid is now ready to join to each base corner.
Place the finishing touches on your prism:
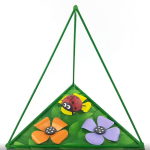
- Set your pyramid on top of your cereal box and trace its outline with a pencil.
- Use scissors to cut out the shape, which will serve as the base of your pyramid.
- Decorate (paint, color, etc.) your wooden skewer prism at this step.
- Cover your base with the green leaves template you printed out in step one by placing your cardboard outline over top of your template, tracing it, and cutting it out with scissors (leave about 3/4" additional space around your template for finishing purposes).
- Glue your cardboard to the back of your green leaf template.
- Place a small amount of hot glue down on one side of your cardboard, quickly folding the edges of the green leaf paper cutout, covering the sides of your cardboard base.
- Use a glue stick to affix any loose edges that may still appear.
Prepare your jitterbug:
- Find the centerline of your ping pong ball and mark it with a pencil.
- Carefully cut the ping pong ball in half.
- If your ping pong ball has jagged edges, try using a piece of sandpaper to smooth them out.
- Set half of your ping pong on top of your black cardstock and trace it, leaving about 3/4“ additional room around your circle (you may need to use chalk or a white marker to see the trace line).
- Hand draw three legs on either side of your ping pong ball circles for legs, and cut them out accordingly.
- Place a small amount of glue around the edges of your ping pong ball and affix it to your black cardstock.
- Trim any excess cardstock.
- Decorate your jitterbug with paint, markers, etc. Make sure to remember the eyes.
- Threading your sewing needle with the fishing line, push the top of your jitterbug and the underside of the black cardstock.
- Using a small amount of hot glue, secure the end of your fishing line to your cardboard.
Finish your jitterbugs:
- As the magnet under the jitterbug must repel the other three magnets on the base, test your magnets to ensure you place the correct magnet on the cardstock under your jitterbug.
- Once confirmed, place a small amount of glue on your magnet and attach it to the bottom of your jitterbug.
Attach your prism to the green leaf base:
- Taking care to line up your edges, place your pyramid on top of your green leaf cardboard base, securing each corner with a dab of hot glue.
- Decorate your newly secured base with three flowers from the flower template you printed out in step one. They should appear in a triangular shape, mimicking the shape of your base.
- Place one magnet in the center of each flower center, affixing it with a small amount of hot glue.
Test your creation:
- Take your jitterbug attached to the fishing line and hold it under the center of your prism.
- Adjust the length of your fishing line if needed to see the magnet jump and hop.
- Once you are satisfied with the height of your jitterbug, place a blob of hot glue to the end of your fishing line and affix it to the top of your pyramid.
- Finally, watch your jitterbug dance and record any findings in a notebook or on a digital note!
Taking Ordinary to Extraordinary with Apex
Whether it is a fun Saturday afternoon DIY or a home hack that saves you time each day, Apex is your destination for great, easy-to-follow ideas and projects at our weekly blog. We are here to bring you a bit of summer inspiration that will have you checking off your to-do list without the stress! And remember, whenever you have a question, our magnet masters are always here to lend their expertise! Give us a call at 1-304-257-1193 and get the answers you are looking for fast!