
DIY Magnetic Chore Chart for a More Organized Summer
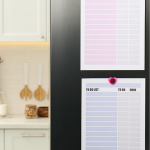
A DIY magnetic chore chart can help bring a little structure to summer days without making your home feel like boot camp. With school out, regular routines can quickly disappear. Instead of repeating reminders all summer long, create a magnetic chore chart that gives everyone a clear view of what needs to be done.
This easy DIY project combines creativity and organization, and because the magnets are movable, you can update the chart as your family’s schedule changes. Ready to make summer responsibilities a little more manageable?
Why Make a Magnetic Chore Chart?
Summer schedules can change from one week to the next. One week might include sports camps and playdates, while the next includes vacation or long days spent at home.
A magnetic chore chart gives families the flexibility to adjust responsibilities without creating an entirely new chart.
Simply move the magnets.
You can use your chart to:
- Assign daily or weekly chores
- Rotate responsibilities between family members
- Track completed tasks
- Create morning or bedtime routines
- Set summer reading or activity goals
- Help kids see what they need to accomplish before screen time or other activities
It’s practical, reusable, and much more fun to look at than a handwritten list taped to the refrigerator.
Chore Chart Supplies
You will need:
- A magnetic whiteboard, metal board, or other magnetic surface
- Small adhesive magnets
- Cardstock, wooden craft pieces, bottle caps, or other materials for creating chore markers
- Markers, paint, stickers, or vinyl lettering
- Glue or adhesive appropriate for your materials
- A ruler
- Paper and a pencil for planning your layout
Before choosing your board, test it with a magnet. Not every metal surface is magnetic, and some stainless steel appliances may not attract magnets.
Step 1: Choose Your Chore Chart Design
Start by deciding how you want your chart to work.
There is no single correct layout. The best design depends on your family and what you want to accomplish.
One simple option is to divide your board into two sections: TO DO and DONE
Kids move each chore magnet from one side to the other as they complete their responsibilities.
For multiple children, divide the board into sections with each person’s name. Place assigned chores under each name, then move them to the completed section when finished.
You could also create columns for the days of the week and move chores around based on your family’s schedule.
Before drawing lines or adding permanent decorations, sketch your layout on paper. This makes it easier to decide how many chore magnets you need and how much space to leave between sections.
Step 2: Create Your Chore Magnets
Write down a list of responsibilities you want to include. Depending on your children’s ages, chore ideas might include:
- Make the bed
- Feed the pet
- Put away toys
- Empty the dishwasher
- Set the table
- Water the plants
- Put dirty clothes in the hamper
- Help with laundry
- Read for 20 minutes
- Clean up outdoor toys
- Pack away sports equipment
Create one marker for each chore.
You can keep the design simple by writing the chores on cardstock, or get more creative with painted wooden shapes, colorful labels, or small illustrations.
For younger children who are not reading independently yet, use pictures or symbols to represent each task.
Attach a small adhesive magnet to the back of each chore marker. Allow everything to dry completely before using your chore magnets.
Step 3: Add Names or Categories
Next, personalize the chart for your family.
Add each family member’s name or create categories such as:
Morning
Afternoon
Evening
You could also organize responsibilities by frequency:
Every Day
Once a Week
As Needed
Have fun with this part. Choose colors, lettering, or decorations that complement your home and make the chart something you actually want to keep on display. You could even let each child decorate a name magnet to add their own personality to the project.
Step 4: Put Your Magnetic Chore Chart to Work
At the beginning of each day or week, assign the appropriate chore magnets. When someone completes a task, they move the magnet to the “Done” section. At the end of the day, check the board together and reset the magnets for tomorrow.
The goal is not to create an overly complicated system. Your magnetic chore chart should make family routines easier, not give you one more thing to manage.
If something is not working, change it. That is one of the biggest benefits of using magnets. You can rearrange, add, or remove chores as your family’s needs change throughout the summer.
Ideas for Customizing Your Chore Chart
Once you have the basic design, there are plenty of ways to make your DIY magnetic chore chart work for your family.
Add a Summer Bucket List
Not every magnet needs to represent work.
Create magnets for fun summer activities, such as:
- Go to the pool
- Have a movie night
- Visit the library
- Make a craft
- Play outside
- Go for a bike ride
When everyone finishes their responsibilities, choose a summer activity together.
Create a Reward System
If rewards work well for your family, add stars, points, or special reward magnets.
Kids could work toward choosing dinner, picking the next family movie, staying up a little later, or planning a special weekend activity.
Add Blank Magnets
Summer plans change quickly.
Keep a few blank chore magnets on hand so you can add new responsibilities, reminders, or activities as needed.
Choosing Magnets for Your Project
The best magnet for a DIY magnetic chore chart depends on the size and weight of your chore markers. Small disc magnets with adhesive backs can work well for lightweight cardstock, wooden shapes, and other craft materials.
Before assembling the entire project, test one completed chore magnet on your board. Make sure the magnet can support the decorative piece's weight and is easy to move without sliding off the surface.
Remember that stronger is not always better, especially for a family craft. Choose an appropriately sized magnet for your project, and always have an adult handle neodymium magnets and supervise children around them.
Not sure what size or shape you need? The Apex Magnets team can help you select an option that works for your project.
Create a Summer Routine That Works for Your Family
Summer should leave plenty of room for fun, but a little organization can help everything run more smoothly. A DIY magnetic chore chart gives kids a visual reminder of their responsibilities while giving parents a flexible system that can adapt to busy summer schedules. Even better, you can design it to fit your family, your home, and your routines.
At Apex Magnets, we have years of experience helping customers find magnets for creative projects, home organization, and everyday problem-solving. Our fully stocked warehouse means fast processing and shipping, and our knowledgeable team is available to provide personal guidance when you need help choosing the right magnet.
Learn More About Magnets
Looking for more creative ways to use magnets around your home? Explore the Apex Magnets blog for DIY projects, organization ideas, STEM activities, and helpful information about magnets. You can also browse our selection of magnets for your next project or contact our experienced team for personalized assistance.
Safety Warning: Children should not be allowed to play with neodymium magnets as they can be dangerous. Small magnets pose a choking hazard and should never be swallowed or inserted into any part of the body.
Magnets can be dangerous. Neodymium magnets, especially, must be handled with care to avoid personal injury and damage to the magnets. Fingers and other body parts can get severely pinched between two attracting magnets. Bones can be broken by larger magnets. Visit our Magnet Safety page to learn more.