How To Make A Magnetic Key Shelf
Keeping track of your keys is essential, but it can be difficult to stay organized if you don't have one designated place for them. The time has come for spring cleaning, and what better way to kick things off than by collecting your keys onto one rack? Instead of tossing them onto a cluttered table or other place where they might be difficult to spot, LifeHacker noted that you can make sure they're instantly accessible by constructing your own magnetic shelf. Instructables devised an optimal way to make one using wood, rare earth magnets and several other basic tools.
Here's a guide to building one of these useful racks:
Supplies:
- 24" x 3" x 1" craft wood board
- 24" x 4" x 1" craft wood board
- 3/4" spade drill bit
- Drill
- Ruler
- 2 medium sized tension clamps
- 6 3/4" x 1/8" disc magnets
- Wood glue
- Sharpie
- Tension clamps
- Wood stain
- Polyurethane/semi-gloss
- Brushes or rags (to apply the polyurethane)
- 2 #12 3" brass wood screws
- Wall anchors
- 3-5 standard 2" wood screws
- 5 #10 1/2 or 3/4" wood screws
Instructions:
- First you need to adhere the boards together with a liberal amount of wood glue. Then use the tension clamps to keep them securely attached.
- Next, carefully pre-drill pilot holes for your wood screws and affix the two pieces together. Instructables noted that it's important to wedge scrap wood between your boards and the vice teeth to ensure your shelf doesn't get damaged.
- The easiest way to attach your neodymium magnets is with strong glue. Make sure to mark the placement for them by measuring 1 inch from each end of the board so that they're evenly spaced. Use as many as you deem necessary, depending on how many keys you have.
- Now it's time to sand the wood. Instructables recommended starting with 120 grit sand paper before moving on to 200 grit paper for a smoother finish. Wipe down the boards with a damp cloth.
- Apply one coat of water-based stain to the wood. Wait for it to dry and then re-apply.
- Treat the entire shelf with three coats of semi-gloss polyurethane, letting each coat dry before applying another. Between each coat, sand the shelf with a tack cloth.
- Lastly, pre-drill two evenly spaced holes in the back of the shelf. Place it against the wall and level it before mounting it using the two brass 3" #10 wood screws. Attach the brass screws using the proper sized wall anchors if you're not putting the shelf directly onto a stud.
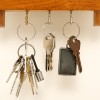
- Now you can easily attach all of your keys to your new magnetic rack.