DIY: Peeps Magnets for Spring or Easter
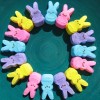
One of the most iconic symbols of spring and Easter is the colorful marshmallow chicks and bunnies that start popping up in stores. Now, you can turn those marshmallow candies into cute magnets, without sacrificing any of the goodies. Below is an abridged version of the DIY from Amy at Mod Podge Rocks.
Supplies
-
Peeps cookie cutters
-
Polymer clay (pink, yellow, black)
-
Rolling pin
-
Craft glue
-
Cookie sheet
Steps
-
Roll out the polymer clay on a non-stick surface.
-
Once the clay is flat and smooth, press down the cookie cutters. Use pink for the bunnies and yellow for the chicks.
-
Place all of the cut clay pieces on a non-stick cookie sheet.
-
Roll little balls out of the black or brown clay to press into the clay cutouts for the eyes and the bunny noses.
-
Bake at 275 degrees for 10-20 minutes. Make sure to check the clay frequently as to not burn the clay. Note: Baking times may vary depending on what type of polymer clay you use. Most have baking instructions that you can use to help gauge time and temperature.
-
Remove from oven and let cool for 30 minutes.
-
Once cool flip the clay pieces face down and stick the disc magnets onto the back with a drop of glue.