We Created a Customizable Sword Stand with Apex Magnets
At Apex Magnets, we do more than help you find the right magnets for your needs—we also like to play around with our products to find fun and effective ways to use magnets in our everyday lives. Our most recent project? A customizable sword stand. By creating a sword stand that we can change to fit our needs, we’ve found a way to safely store swords in one location while eliminating the need to buy new stands when the sword collection grows. Here’s how we did it:
What you’ll need:
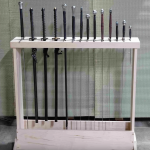
 And there you have it! You can see the finished project and how it works here!
How would you use Apex Magnets?
Even if you aren’t a sword enthusiast, you could repurpose this DIY to hold other objects such as pool cues, walking canes, umbrellas, or anything else that can benefit from adjustable slots. How do you use Apex Magnets? We’ve heard of some pretty innovative uses of our products, including the use of magnets to keep lures in place while fishing in Japan!
If you’ve made something creative with our magnets, we want to hear from you. Send us an email at service@apexmagnets.com or message us on Facebook for a chance to be featured.
And there you have it! You can see the finished project and how it works here!
How would you use Apex Magnets?
Even if you aren’t a sword enthusiast, you could repurpose this DIY to hold other objects such as pool cues, walking canes, umbrellas, or anything else that can benefit from adjustable slots. How do you use Apex Magnets? We’ve heard of some pretty innovative uses of our products, including the use of magnets to keep lures in place while fishing in Japan!
If you’ve made something creative with our magnets, we want to hear from you. Send us an email at service@apexmagnets.com or message us on Facebook for a chance to be featured.
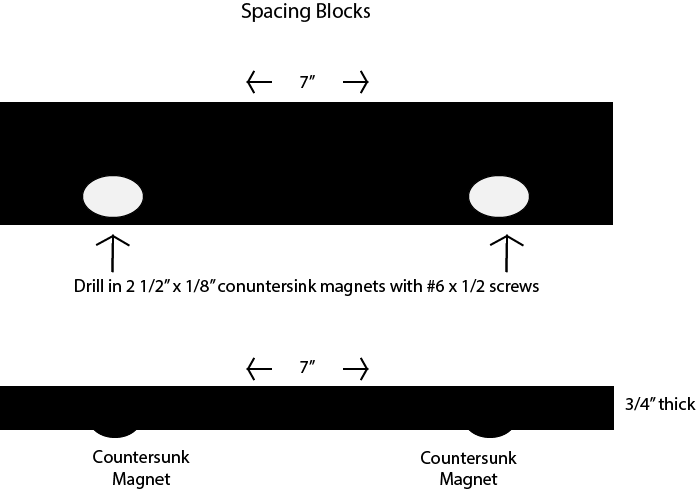
- 1/2”x1/8” countersink rings (2 magnets per block)
- Sturdier wood (such as maple)
- 2 metal strips—these will serve as the tracks for the magnets in the blocks
- Screws & Nails
- Wood glue
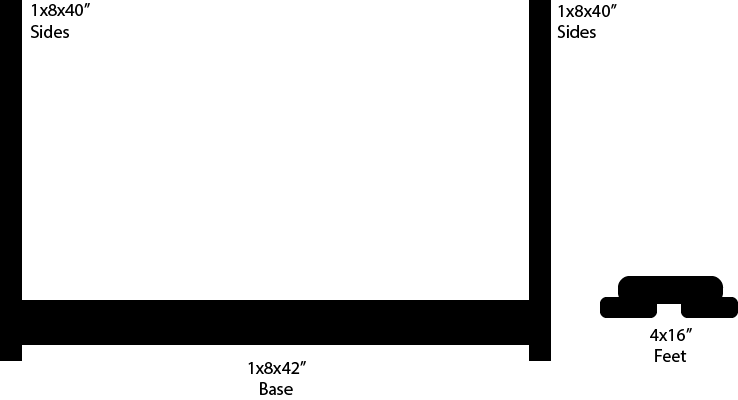
- Assemble the base, feet, and sides
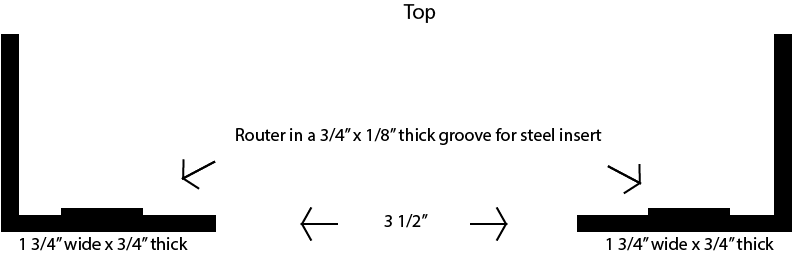
- Assemble the top w/ steel strips
- Create spacing blocks
And there you have it! You can see the finished project and how it works here!
How would you use Apex Magnets?
Even if you aren’t a sword enthusiast, you could repurpose this DIY to hold other objects such as pool cues, walking canes, umbrellas, or anything else that can benefit from adjustable slots. How do you use Apex Magnets? We’ve heard of some pretty innovative uses of our products, including the use of magnets to keep lures in place while fishing in Japan!
If you’ve made something creative with our magnets, we want to hear from you. Send us an email at service@apexmagnets.com or message us on Facebook for a chance to be featured.