DIY Magnetic Knife Display Rack
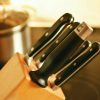
A good cutlery set is a prized possession and essential for creating (or at least attempting to create) those delicious dinners every night. While a traditional knife block is a convenient way to store your cutlery, is it the best way to display them? This do-it-yourself display rack lets you show off your culinary investment. In particular, it’s perfect for those who favor rustic-design.
What You’ll Need:
- Sand paper
- Tape measure
- Power drill
- Adhesive glue
- 2 Wall mounting screws (2.5 inches)
- Drill Bit, 5/32
- 1-Inch round Forstner bit
- Wood board
- 1" x 1/4" Disc - Neodymium Magnet
- Optional: trigger clamps.
Steps:
- Start by measuring the wood to your preferred size. The size will need to be big enough to fit all of your knives (or as many as you want to display).
- Sand wood to the finish you desire. If you prefer a more rustic look than, give the wood a rough sanding.
- Measure an inch from either end (top and bottom) of the wood board on one side and mark two lines, 2.5 inches apart. Set two rows of magnets on the lines.
- On each line, mark 9 points 1.5 inches apart for a drill guide. Then drill holes. Use the clamps to get better control of the wood and ensure precise drilling. Make sure you drill the holes in as far as you can without breaking the wood.
- Using the adhesive glue, glue the magnets into the holes and let them set overnight, or at least 12 hours.
- Mount the display rack with the mounting screws and drill and display your knives!
To get the most out of your new DIY knife display rack, try varying the sizes of the knives you display, and feature the knives with wooden handles. This will add to the rustic look and give your knife rack more depth.
It’s a fairly simple project that would make a great gift for anyone looking to show off their knife stock. Fancy this DIY and want to try your hand at more magnetic projects? We’ve got you covered! Check out the rest of our magnet crafts on our blog for more DIY inspiration and ideas!