Magnetic DIY: Removable Marble Backsplash
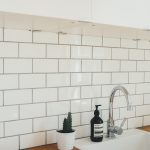
Are you the sort of person who likes to switch up their home decor frequently? Whether that’s every season or maybe even every week, we have a perfect solution for you! This magnetic DIY allows you to easily install a kitchen backsplash and change it out whenever you want! We’ll start you off with something very simple and classic—marble. Once you try out the magnetic marble backsplash, you are free to switch it up as many times as you want — with any material really!
Make some time this weekend for this functional yet fun craft — let’s get started!
What You’ll Need:
- Magnetic dry erase board large enough to fill the entire backsplash space
- Construction adhesive
- Cardboard or paper to use for measurement
- Scissors and pencil
- Circular saw with carbide blade
- Marble tiles of your choosing
- 14mm x 2mm Neodymium magnets (or sized bigger or smaller depending on the size of tiles)
- Glue
- First you need to measure the dimensions of the backsplash area. To do this, take your cardboard and trace the measurements, then, cut it out precisely with scissors. This will be your template, so double check that it fits exactly where you want your backsplash to lay.
- Transfer your template onto the dry erase board and cut it out using a circular saw. You can also take the measurements and dry erase board to a hardware store near you, and they can size it for you!
- Next, put the construction adhesive onto the backside of your freshly cut dry erase board and attach it to the wall. Let dry completely.
- You can either buy your favorite marble tiles or make them! If you want to make your own check out this blog on making marble coasters that work perfectly as a backsplash.
- Once you have your marble pieces, glue the neodymium disc magnets to the back and let dry.